
Firmware sits at the core of almost every electronic product today. It’s at the heart of vulnerabilities in products. So you’ve extracted firmware from an external flash device and you’re itching to reverse it to figure out how the product ticks. What now?
You could go the route of full blown custom analysis and tools (believe me, we’ve been there), but thankfully there’s a lot of tools that can get you there quickly. Sometimes you still have to create tools to reverse the code, or add to an existing tool to support custom formats or encryption, but thankfully a lot of firmware binaries don’t require this. Let’s take a look at some of the top tools to help you do firmware analysis.
We’ll use Ubuntu 22.04 as the host computer, but you can adjust this to any system since the utilities will work regardless.
Many of the tools have man pages which provide a lot of details with the arguments the tools accepts, how to use them, etc. To see the man page of a tool use man <tool name>. For example man file gives you the manual for the file utility.
File Utility
Supported Systems: Linux, Mac
How to Get: Installed as part of Linux and macOS
The Linux file utility hides a lot of power behind that innocuous name. it can decode significant information about a file by analyzing signatures of headers. Here we took a Netgear router binary firmware file.
You can see that it gives information about the bootloader, but lets us know this is a NAND Flash Linux Image.
~/fw$ file R6950.bin
R6950.bin: u-boot legacy uImage, NAND Flash I, Linux/MIPS, Standalone Program (Not compressed), 207800 bytes, Thu Nov 29 19:46:01 2018, Load Address: 0XA0200000, Entry Point: 0XA0200000, Header CRC: 0XADA6C902, Data CRC: 0XD58A6B6F
Binwalk
Supported Systems: Linux, Mac
How to Get: Installed with Python
What’s Binwalk?

While file can provide a lot of initial information about a file, but the real analysis is done by Binwalk, the swiss army knife of binary firmware extraction. Binwalk is a tool used for analyzing and extracting firmware images and embedded file systems. It is widely used in the fields of reverse engineering, cybersecurity, and forensics.
Binwalk can scan a binary image for embedded files and executable code, identifying known file types and signatures within the image. This makes it an invaluable tool for those looking to analyze the internals of firmware packages without having direct access to the source code.
It’s is actually a python tool and recent versions required Python 3.6+. I highly recommend using the latest binwalk, not just because it will have more signatures and improved support, but because some of the latest versions fix issues with extraction causing issues.
Mac Installation
Binwalk can be installed directly in macOS using port as follows:
~/fw$ sudo port install binwalkI’d recommend checking the binwalk version because port may not always be using the latest version.
Installation from Source
Binwalk can be downloaded from github using git.
~/fw$ sudo apt-get install git
[sudo] password for dev:
Reading package lists... Done
Building dependency tree... Done
Reading state information... Done
The following additional packages will be installed:
  git-man liberror-perl
Suggested packages:
  git-daemon-run | git-daemon-sysvinit git-doc git-email git-gui gitk gitweb git-cvs git-mediawiki git-svn
The following NEW packages will be installed:
  git git-man liberror-perl
0 upgraded, 3 newly installed, 0 to remove and 370 not upgraded.
Need to get 4,147 kB of archives.
After this operation, 21.0 MB of additional disk space will be used.
Do you want to continue? [Y/n] y
Get:1 http://us.archive.ubuntu.com/ubuntu jammy/main amd64 liberror-perl all 0.17029-1 [26.5 kB]
Get:2 http://us.archive.ubuntu.com/ubuntu jammy-updates/main amd64 git-man all 1:2.34.1-1ubuntu1.10 [954 kB]
Get:3 http://us.archive.ubuntu.com/ubuntu jammy-updates/main amd64 git amd64 1:2.34.1-1ubuntu1.10 [3,166 kB]
Fetched 4,147 kB in 1s (4,505 kB/s)
Selecting previously unselected package liberror-perl.
(Reading database ... 198165 files and directories currently installed.)
Preparing to unpack .../liberror-perl_0.17029-1_all.deb ...
Unpacking liberror-perl (0.17029-1) ...
Selecting previously unselected package git-man.
Preparing to unpack .../git-man_1%3a2.34.1-1ubuntu1.10_all.deb ...
Unpacking git-man (1:2.34.1-1ubuntu1.10) ...
Selecting previously unselected package git.
Preparing to unpack .../git_1%3a2.34.1-1ubuntu1.10_amd64.deb ...
Unpacking git (1:2.34.1-1ubuntu1.10) ...
Setting up liberror-perl (0.17029-1) ...
Setting up git-man (1:2.34.1-1ubuntu1.10) ...
Setting up git (1:2.34.1-1ubuntu1.10) ...
Processing triggers for man-db (2.10.2-1) ...
~/fw$
If you need python 3.6+, you can find many guides to install python for your system. Make sure python is installed
~/fw$ python3 --version
Python 3.10.6
We also need setuptools
~/fw$ sudo apt-get install python3-setuptools 7zip
.
.
.
~/fw$
You will also need to have Java installed in case there are Jar files in the binary.
~/fw$ sudo apt install default-jreNow that git and python are installed, we can fetch binwalk and install
~/fw$ git clone https://github.com/ReFirmLabs/binwalk.git
Cloning into 'binwalk'...
remote: Enumerating objects: 8520, done.
remote: Counting objects: 100% (202/202), done.
remote: Compressing objects: 100% (105/105), done.
remote: Total 8520 (delta 104), reused 149 (delta 94), pack-reused 8318
Receiving objects: 100% (8520/8520), 44.12 MiB | 16.08 MiB/s, done.
Resolving deltas: 100% (4928/4928), done.
~/fw$
Now let’s make binwalk and install it:
~/fw$ cd binwalk \
sudo python3 setup.py install
running install
/usr/lib/python3/dist-packages/setuptools/command/install.py:34: SetuptoolsDeprecationWarning: setup.py install is deprecated. Use build and pip and other standards-based tools.
  warnings.warn(
running bdist_egg
running egg_info
creating src/binwalk.egg-info
writing src/binwalk.egg-info/PKG-INFO
writing dependency_links to src/binwalk.egg-info/dependency_links.txt
writing top-level names to src/binwalk.egg-info/top_level.txt
writing manifest file 'src/binwalk.egg-info/SOURCES.txt'
reading manifest file 'src/binwalk.egg-info/SOURCES.txt'
adding license file 'LICENSE'
adding license file 'NOTICE.md'
writing manifest file 'src/binwalk.egg-info/SOURCES.txt'
installing library code to build/bdist.linux-x86_64/egg
running install_lib
running build_py
creating build
creating build/lib
creating build/lib/binwalk
copying src/binwalk/__init__.py -> build/lib/binwalk
copying src/binwalk/__main__.py -> build/lib/binwalk
.
.
.
Installed /usr/local/lib/python3.10/dist-packages/binwalk-2.3.3+cddfede-py3.10.egg
Processing dependencies for binwalk==2.3.3+cddfede
Finished processing dependencies for binwalk==2.3.3+cddfede
~/fw$
Once the installation is complete, you can run binwalk anywhere. So let’s run it on our binary:
~/fw$ binwalk R6950.bin

DECIMAL       HEXADECIMAL     DESCRIPTION
--------------------------------------------------------------------------------
0             0x0             uImage header, header size: 64 bytes, header CRC: 0xADA6C902, created: 2018-11-29 19:46:01, image size: 207800 bytes, Data Address: 0xA0200000, Entry Point: 0xA0200000, data CRC: 0xD58A6B6F, OS: Linux, CPU: MIPS, image type: Standalone Program, compression type: none, image name: "NAND Flash I"
170624        0x29A80         U-Boot version string, "U-Boot 1.1.3 (Nov 29 2018 - 14:45:51)"
982970        0xEFFBA         Sercomm firmware signature, version control: 256, download control: 0, hardware ID: "BZV", hardware version: 0x4100, firmware version: 0x90, starting code segment: 0x0, code size: 0x7300
2097152       0x200000        uImage header, header size: 64 bytes, header CRC: 0x97E7E72D, created: 2021-12-08 01:31:02, image size: 3354333 bytes, Data Address: 0x81001000, Entry Point: 0x8100D1D0, data CRC: 0x8EECF158, OS: Linux, CPU: MIPS, image type: OS Kernel Image, compression type: lzma, image name: "Linux Kernel Image"
2097216       0x200040        LZMA compressed data, properties: 0x5D, dictionary size: 33554432 bytes, uncompressed size: 8472960 bytes
6291456       0x600000        Squashfs filesystem, little endian, version 4.0, compression:xz, size: 24103513 bytes, 2471 inodes, blocksize: 131072 bytes, created: 2021-12-08 01:30:52
48234496      0x2E00000       Sercomm firmware signature, version control: 256, download control: 0, hardware ID: "BZV", hardware version: 0x4100, firmware version: 0x70, starting code segment: 0x0, code size: 0x7300
48234624      0x2E00080       Zip archive data, at least v2.0 to extract, compressed size: 29078, uncompressed size: 192206, name: ui.xml
48263759      0x2E0724F       Zip archive data, at least v2.0 to extract, compressed size: 13686, uncompressed size: 88843, name: msg.xml
48277503      0x2E0A7FF       Zip archive data, at least v2.0 to extract, compressed size: 44378, uncompressed size: 201305, name: hlp.js
48322134      0x2E15656       End of Zip archive, footer length: 22
50331648      0x3000000       Sercomm firmware signature, version control: 256, download control: 0, hardware ID: "BZV", hardware version: 0x4100, firmware version: 0x70, starting code segment: 0x0, code size: 0x7300
50331776      0x3000080       Zip archive data, at least v2.0 to extract, compressed size: 31686, uncompressed size: 182060, name: ui.xml
50363519      0x3007C7F       Zip archive data, at least v2.0 to extract, compressed size: 14998, uncompressed size: 85538, name: msg.xml
50378575      0x300B74F       Zip archive data, at least v2.0 to extract, compressed size: 51382, uncompressed size: 188582, name: hlp.js
.
.
.
I had to cut off because there were more files and it would get long.
The binary contains a uImage. We can clearly see that there’s a U-boot bootloader version 1.1.3. This information can help you figure out if there are some vulnerabilities in U-Boot that can be exploited on the hardware.
The main item is the Linux kernel image as well as bunch of Squashfs file system which is very common in embedded linux routers.
Binwalk doesn’t just view the file like the file utility, but can can extract the various parts to make them easier to work with, look at entropy and more
To extract the file, we call extract with e (lowercase) parameter as a parameter
~/fw$ binwalk -e R6950.bin

DECIMAL       HEXADECIMAL     DESCRIPTION
--------------------------------------------------------------------------------
0             0x0             uImage header, header size: 64 bytes, header CRC: 0xADA6C902, created: 2018-11-29 19:46:01, image size: 207800 bytes, Data Address: 0xA0200000, Entry Point: 0xA0200000, data CRC: 0xD58A6B6F, OS: Linux, CPU: MIPS, image type: Standalone Program, compression type: none, image name: "NAND Flash I"
170624        0x29A80         U-Boot version string, "U-Boot 1.1.3 (Nov 29 2018 - 14:45:51)"
982970        0xEFFBA         Sercomm firmware signature, version control: 256, download control: 0, hardware ID: "BZV", hardware version: 0x4100, firmware version: 0x90, starting code segment: 0x0, code size: 0x7300
2097152       0x200000        uImage header, header size: 64 bytes, header CRC: 0x97E7E72D, created: 2021-12-08 01:31:02, image size: 3354333 bytes, Data Address: 0x81001000, Entry Point: 0x8100D1D0, data CRC: 0x8EECF158, OS: Linux, CPU: MIPS, image type: OS Kernel Image, compression type: lzma, image name: "Linux Kernel Image"
2097216       0x200040        LZMA compressed data, properties: 0x5D, dictionary size: 33554432 bytes, uncompressed size: 8472960 bytes

WARNING: Extractor.execute failed to run external extractor 'sasquatch -p 1 -le -d 'squashfs-root-0' '%e'': [Errno 2] No such file or directory: 'sasquatch', 'sasquatch -p 1 -le -d 'squashfs-root-0' '%e'' might not be installed correctly

WARNING: Extractor.execute failed to run external extractor 'sasquatch -p 1 -be -d 'squashfs-root-0' '%e'': [Errno 2] No such file or directory: 'sasquatch', 'sasquatch -p 1 -be -d 'squashfs-root-0' '%e'' might not be installed correctly

WARNING: Symlink points outside of the extraction directory: /home/dev/fw/_AC2100-V1.2.0.90_1.0.1.img.extracted/_R6950.bin.extracted/squashfs-root/var -> /tmp/var; changing link target to /dev/null for security purposes.

WARNING: Symlink points outside of the extraction directory: /home/dev/fw/_AC2100-V1.2.0.90_1.0.1.img.extracted/_R6950.bin.extracted/squashfs-root/home -> /tmp/home_directory; changing link target to /dev/null for security purposes.

WARNING: Symlink points outside of the extraction directory: /home/dev/fw/_AC2100-V1.2.0.90_1.0.1.img.extracted/_R6950.bin.extracted/squashfs-root/www -> /tmp/www; changing link target to /dev/null for security purposes.

WARNING: Symlink points outside of the extraction directory: /home/dev/fw/_AC2100-V1.2.0.90_1.0.1.img.extracted/_R6950.bin.extracted/squashfs-root/mnt -> /tmp/mnt; changing link target to /dev/null for security purposes.

WARNING: Symlink points outside of the extraction directory: /home/dev/fw/_AC2100-V1.2.0.90_1.0.1.img.extracted/_R6950.bin.extracted/squashfs-root/etc_ro -> /tmp/etc_ro; changing link target to /dev/null for security purposes.

WARNING: Symlink points outside of the extraction directory: /home/dev/fw/_AC2100-V1.2.0.90_1.0.1.img.extracted/_R6950.bin.extracted/squashfs-root/etc -> /tmp/etc; changing link target to /dev/null for security purposes.

WARNING: Symlink points outside of the extraction directory: /home/dev/fw/_AC2100-V1.2.0.90_1.0.1.img.extracted/_R6950.bin.extracted/squashfs-root/www.eng/NETGEAR_R6900v2.cfg -> /tmp/NETGEAR_R6900v2.cfg; changing link target to /dev/null for security purposes.

WARNING: Symlink points outside of the extraction directory: /home/dev/fw/_AC2100-V1.2.0.90_1.0.1.img.extracted/_R6950.bin.extracted/squashfs-root/www.eng/NETGEAR_R7450.cfg -> /tmp/NETGEAR_R7450.cfg; changing link target to /dev/null for security purposes.

WARNING: Symlink points outside of the extraction directory: /home/dev/fw/_AC2100-V1.2.0.90_1.0.1.img.extracted/_R6950.bin.extracted/squashfs-root/www.eng/svn.info -> /etc/svn.info; changing link target to /dev/null for security purposes.

WARNING: Symlink points outside of the extraction directory: /home/dev/fw/_AC2100-V1.2.0.90_1.0.1.img.extracted/_R6950.bin.extracted/squashfs-root/www.eng/netgear.cfg -> /tmp/netgear.cfg; changing link target to /dev/null for security purposes.

WARNING: Symlink points outside of the extraction directory: /home/dev/fw/_AC2100-V1.2.0.90_1.0.1.img.extracted/_R6950.bin.extracted/squashfs-root/www.eng/NETGEAR_WNDR3600.cfg -> /tmp/NETGEAR_WNDR3600.cfg; changing link target to /dev/null for security purposes.

WARNING: Symlink points outside of the extraction directory: /home/dev/fw/_AC2100-V1.2.0.90_1.0.1.img.extracted/_R6950.bin.extracted/squashfs-root/www.eng/.htpasswd -> /etc/htpasswd; changing link target to /dev/null for security purposes.

WARNING: Symlink points outside of the extraction directory: /home/dev/fw/_AC2100-V1.2.0.90_1.0.1.img.extracted/_R6950.bin.extracted/squashfs-root/www.eng/setupwizard.cgi -> /tmp/setupwizard.cgi; changing link target to /dev/null for security purposes.

WARNING: Symlink points outside of the extraction directory: /home/dev/fw/_AC2100-V1.2.0.90_1.0.1.img.extracted/_R6950.bin.extracted/squashfs-root/www.eng/shares -> /tmp/shares; changing link target to /dev/null for security purposes.

WARNING: Symlink points outside of the extraction directory: /home/dev/fw/_AC2100-V1.2.0.90_1.0.1.img.extracted/_R6950.bin.extracted/squashfs-root/www.eng/NETGEAR_R6700v2.cfg -> /tmp/NETGEAR_R6700v2.cfg; changing link target to /dev/null for security purposes.

WARNING: Symlink points outside of the extraction directory: /home/dev/fw/_AC2100-V1.2.0.90_1.0.1.img.extracted/_R6950.bin.extracted/squashfs-root/www.eng/ppp_log -> /tmp/ppp_log; changing link target to /dev/null for security purposes.

WARNING: Symlink points outside of the extraction directory: /home/dev/fw/_AC2100-V1.2.0.90_1.0.1.img.extracted/_R6950.bin.extracted/squashfs-root/www.eng/NETGEAR_AC2100.cfg -> /tmp/NETGEAR_AC2100.cfg; changing link target to /dev/null for security purposes.
During the extraction, binwalk attempts to place everything where it should go, but it finds symlinks that would end up being placed in our own root file system and it changes them.
When extracting, binwalk
Binwalk creates a folder as output with the name _<filename>.extracted, where <filename> is the name of the file being extracted.
~/fw$
~/fw$ cd _R6950.bin.extracted/
~/fw/_R6950.bin.extracted$ ls
200040     2E00080.zip  3200080.zip  3600080.zip  3A00080.zip  3E00080.zip  4200080.zip  600000.squashfs  squashfs-root-0
200040.7z  3000080.zip  3400080.zip  3800080.zip  3C00080.zip  4000080.zip  4400080.zip  squashfs-root
Since this is a linux image, there are three critical parts
- Bootloader – looking at uBoot in this case could allow us to find a way to root a system via the bootloader
- Linux Kernel Image
- File System
Here’s the Root file system that we extracted:
~/fw$ ls -la
total 92
drwxr-xr-x 12 dev dev  4096 Dec 11 23:26 .
drwxrwxr-x  4 dev dev  4096 Dec 11 23:26 ..
lrwxrwxrwx  1 dev dev     9 Dec  7  2021 bin -> usr/sbin/
drwxrwxr-x  2 dev dev  4096 Aug 15  2015 data
drwxr-xr-x  2 dev dev  4096 Oct 19  2015 dev
lrwxrwxrwx  1 dev dev     9 Dec 11 23:26 etc -> /dev/null
lrwxrwxrwx  1 dev dev     9 Dec 11 23:26 etc_ro -> /dev/null
lrwxrwxrwx  1 dev dev     9 Dec 11 23:26 home -> /dev/null
lrwxrwxrwx  1 dev dev    11 Dec  7  2021 init -> bin/busybox
drwxr-xr-x  6 dev dev 12288 Dec  7  2021 lib
drwxr-xr-x  2 dev dev  4096 Dec  2  2012 media
lrwxrwxrwx  1 dev dev     9 Dec 11 23:26 mnt -> /dev/null
drwxrwxr-x  6 dev dev  4096 Dec  7  2021 opt
drwxr-xr-x  2 dev dev  4096 Nov 12  2000 proc
lrwxrwxrwx  1 dev dev     9 Dec  7  2021 sbin -> usr/sbin/
drwxr-xr-x  2 dev dev  4096 Nov 16  2008 sys
drwxr-xr-x  2 dev dev  4096 Jul 28  2000 tmp
drwxr-xr-x 10 dev dev  4096 Jun 21  2016 usr
lrwxrwxrwx  1 dev dev     9 Dec 11 23:26 var -> /dev/null
lrwxrwxrwx  1 dev dev     9 Dec 11 23:26 www -> /dev/null
drwxrwxr-x 10 dev dev 36864 Dec 11 23:26 www.eng
The Root Filesystem contains everything you can imagine, from configuration files to binaries.
Those binaries can be analyzed either for 0-day vulnerabilities, or you can find out whether that version already has CVEs published which would allow
www.eng in this case contains html files that can lead to finding other vulnerabilities through the web interface like being able to inject code in a buffer overflow that would allow access to passwords.
As I said, binwalk has many options available. The entropy parameter allows binwalk to look at the entropy of data. Entropy is essentially a measure of how different is the data. Low entropy is indicative of data that is indentical. for example, large segments of 0x00 and 0xFF (flash clear) will have low entropy. But high entropy can indicate encryption because encrypted data will look randomized.
To get a nice entropy graph we need to install pip for Python 3 and mathplotlib
~/fw$ sudo apt-get install python3-pip

~/fw$ python3 -m pip install -U matplotlib
Now you can run binwalk with the uppercase E option:
~/fw$ binwalk -E R6950.bin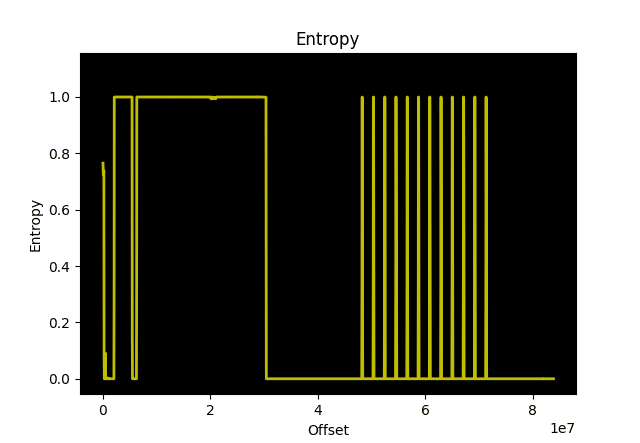
Strings
Supported Systems: Linux, Mac
How to Get: Installed as part of Linux and macOS
Finding strings in binaries is one of the most useful things you can do to narrow down and get information about the firmware and the device. The strings utility in linux does this for you. Let’s take a look. We’re going to run strings but pipe it through less so we can scroll because there are going to be a lot of strings found (as well as plenty of garbage characters). Also, we’ll limit our strings to a minimum of 6 characters to reduce the random characters
~/fw$ strings -n7 R6950.bin | less
NAND Flash I
Thu Mar 12 14:42:54 CST 2015
j@2@2bg
j`3@2`3@2)
j@2@2(1)
j@2@2bgi
`Y\.`:\
`#tQ`$\
.tO`0tu`-tI`'
`htz`i\
it~`lto`
k`3`3Dgi
j@2"l@2
===================================================================
                MT7621   stage1 code %s %s (ASIC)
Mar 12 2015
14:42:52
                CPU=%d HZ BUS=%d HZ
==================================================================
                MT7621   stage1 code done
===================================================================
=====================DBG=====================
[%03x] = %08x
[%03x] = %08x
=============================================
Change MPLL source from XTAL to CR...
do MEMPLL setting..
do DDR setting..[%08X]
skip DDR calibration
[EMI] DRAMC calibration failed
[EMI] DRAMC calibration passed
DRAMC_DQIDLY1[%03x]=%08X
DRAMC_DQIDLY2[%03x]=%08X
DRAMC_DQIDLY3[%03x]=%08X
DRAMC_DQIDLY4[%03x]=%08X
DRAMC_R0DELDLY[%03x]=%08X
*DRAMC_R1DELDLY = 0x%x
                RX      DQS perbit delay software calibration
1.0-15 bit dq delay value
bit|     0  1  2  3  4  5  6  7  8  9
--------------------------------------
%d |
--------------------------------------
2.dqs window
x=pass dqs delay value (min~max)center
y=0-7bit DQ of every group
input delay:DQS0 =%d DQS1 = %d
bit     DQS0     bit      DQS1
%d  (%d~%d)%d  %d  (%d~%d)%d
3.dq delay value last
bit|    0  1  2  3  4  5  6  7  8   9
==================================================================
     TX  perbyte calibration
DQS loop = %d, cmp_err_1 = %x
dqs_perbyte_dly.last_dqsdly_pass[%d]=%d,  finish count=%d
DQ loop=%d, cmp_err_1 = %x
dqs_perbyte_dly.last_dqdly_pass[%d]=%d,  finish count=%d
byte:%x, (DQS,DQ)=(%x,%x)
DRAMC_DQODLY1[%03x]=%08X
DRAMC_DQODLY2[%03x]=%08X
%d,data:%x
rank 0 coarse = %s
rank 0 fine = %s
PLL2 FB_DL: 0x%x, 1/0 = %d/%d %08X
PLL3 FB_DL: 0x%x, 1/0 = %d/%d %08X
PLL4 FB_DL: 0x%x, 1/0 = %d/%d %08X
MEMPLL 3PLL mode calibration fail
X-axis: %s
Y-axis: %s
The strings provide a wealth of information. We can now tell that the chipset of this device is likely a Mediatek MT7621 or similar.
It can be useful to filter the output some more by passing it through grep. In this case, we’ll look for strings that contain “MT” for Mediatek:
~/fw$ strings -n7 R6950.bin | grep "MT" | less
                MT7621   stage1 code %s %s (ASIC)
                MT7621   stage1 code done
0MT29F16G08ABAB
MT7621A
MT7621N
(MAC to MT7530 Mode)
#Reset_MT7530
NFI_PAGEFMT(%08X): 0x%x
Device found in MTK table, ID: %x, EXT_ID: %x
MT7621-NAND
# MTK NAND #
Support this Device in MTK table! %x
MT7621 #
        CZMT_Dz
V       bMTLY
})oNMTq
*NRVb   MT
AMT     x7(
M)g bMT!
iMTz3=_
v==^`MT
LdNMT0s{6
Gh%XMTm
5!:|MT-:
}3MT+99
MTb )fN
It may be useful to know where the strings are located, so call strings with the -t x to get the hex address
~/fw$ strings -n7 -t x R6950.bin | grep "MT" | less
  3fe4                 MT7621   stage1 code %s %s (ASIC)
   4088                 MT7621   stage1 code done
  29c53 0MT29F16G08ABAB
  2a678 MT7621A
  2a680 MT7621N
  2a84c (MAC to MT7530 Mode)
  2b32c #Reset_MT7530
  2ba70 NFI_PAGEFMT(%08X): 0x%x
  2c138 Device found in MTK table, ID: %x, EXT_ID: %x
  2c50c MT7621-NAND
  2c540 # MTK NAND #
  2c5a0 Support this Device in MTK table! %x
  2d098 MT7621 #
 2bf627         CZMT_Dz
 613160 V       bMTLY
 7a5f96 })oNMTq
 ce12bb *NRVb   MT
 d0184e AMT     x7(
10674b1 M)g bMT!
137312c iMTz3=_
14769cf v==^`MT
17953f0 LdNMT0s{6
19f3fcc Gh%XMTm
1baae83 5!:|MT-:
1c5ad62 }3MT+99
2e04c1d MTb )fN
XXD
Supported Systems: Linux, Mac
How to Get: Installed as part of Linux and macOS
XXD is another classic linux utility that helps manipulate binaries. One useful command is to create a c-array from binary values
~/fw$ time dd if=/dev/urandom of=random-file bs=1 count=32
32+0 records in
32+0 records out
32 bytes copied, 0.000276252 s, 116 kB/s

real	0m0.003s
user	0m0.002s
sys	0m0.001s

~/fw$ xxd -i random-file
unsigned char random_file[] = {
  0x2b, 0x2b, 0xde, 0xa3, 0x44, 0x0d, 0xb4, 0x24, 0x53, 0x7d, 0x0f, 0xbd,
  0x46, 0x16, 0x31, 0xf2, 0xb8, 0x8d, 0xe3, 0x91, 0x86, 0x46, 0x3c, 0x1e,
  0x31, 0x62, 0x39, 0x82, 0xf6, 0xea, 0x12, 0x32
};
unsigned int random_file_len = 32;
For the sake of brevity we created a binary file with some random data. Then we used xxd with the -i argument to convert it to a hex
dd
Supported Systems: Linux, Mac
How to Get: Installed as part of Linux and macOS
dd is a command line utility used to copy files. When dealing with binary files, it’s useful to extract specific bytes at specific addresses. Some of the binaries can be large, and it can faster to focus on a trimmed down part of the image. Some utilities also don’t do well with large binaries, or don’t even allow offsets. dd helps deal with all of this.
The parameters are
- if – input file name
- of – output file name
- bs – bytes to access defining the input block size, can use k and M for size
- count – number of input blocks
- seek – specifies the number of obs sized block skipped in the input file
- skip – specifies the number of ibs sized block skipped in the input file
You can read more in the man page, but the critical piece is that we can extract any part of a binary and create another binary by using skip.
~/fw$ dd if=/dev/urandom of=random-file bs=1 count=32
32+0 records in
32+0 records out
32 bytes copied, 0.000276252 s, 116 kB/s

real	0m0.003s
user	0m0.002s
sys	0m0.001s

~/fw$ xxd -i random-file
unsigned char random_file[] = {
  0x2b, 0x2b, 0xde, 0xa3, 0x44, 0x0d, 0xb4, 0x24, 0x53, 0x7d, 0x0f, 0xbd,
  0x46, 0x16, 0x31, 0xf2, 0xb8, 0x8d, 0xe3, 0x91, 0x86, 0x46, 0x3c, 0x1e,
  0x31, 0x62, 0x39, 0x82, 0xf6, 0xea, 0x12, 0x32
};
unsigned int random_file_len = 32;
Ghidra
Supported Systems: Linux, Windows
How to Get: Download from Release page in Git Repository

GHIDRA is an open source reverse engineering tool that can disassemble binaries, similar to IDA Pro that reversers have been using for years. The National Security Agency (NSA) released GHIDRA in 2019 and it’s take off ever since because of its price (free).
Initially IDA Pro still outmatched GHIDRA because of missing functionality, but since GHIDRA has been open sourced, its been the go to tool. So much so that HexRays, the makers of IDA Pro have released a free version.
Ghidra allows a reverser to disasemble and decompile firmware binaries. A raw binary can be extracted, and , if the instruction set and endianess of the processor is known, we can view the CPU instructions and even pseudo C code.
You can download Ghidra from the Ghidra Github repo, but the easiest is to get a Ghidra Release.
To run Ghidra, you need Java installed. With that, just run ghidraRun.bat that’s in the root folder.
Start with File -> New Project and create a Non-shared Project
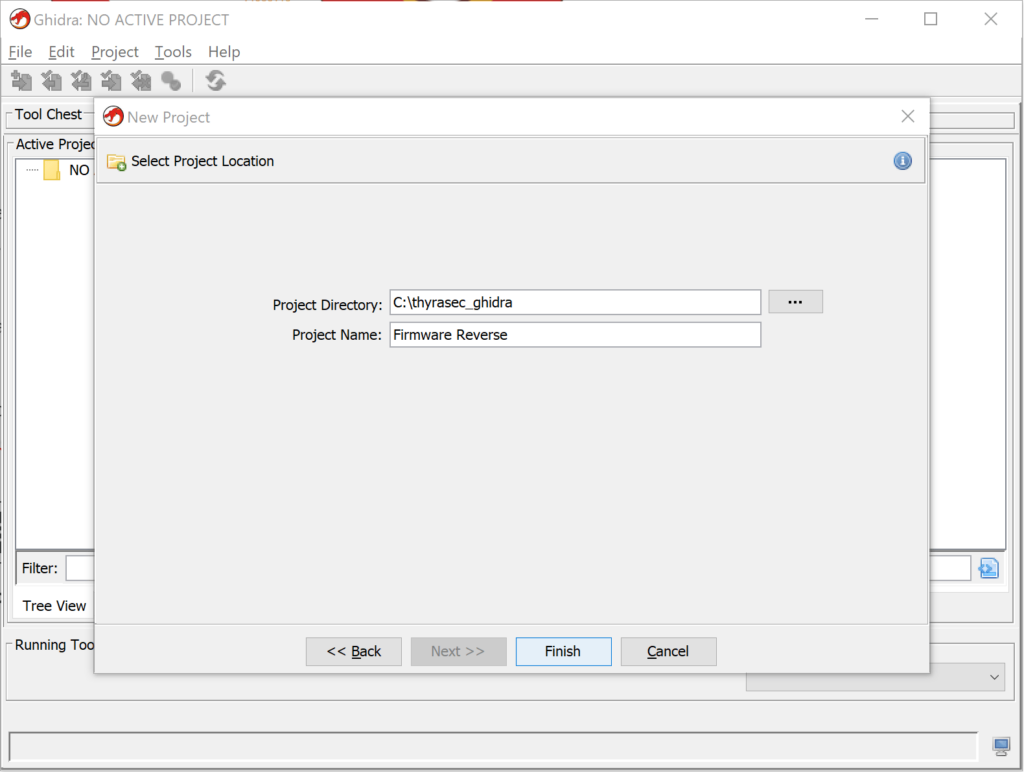
With the new project, we can now Import a binary for analysis.
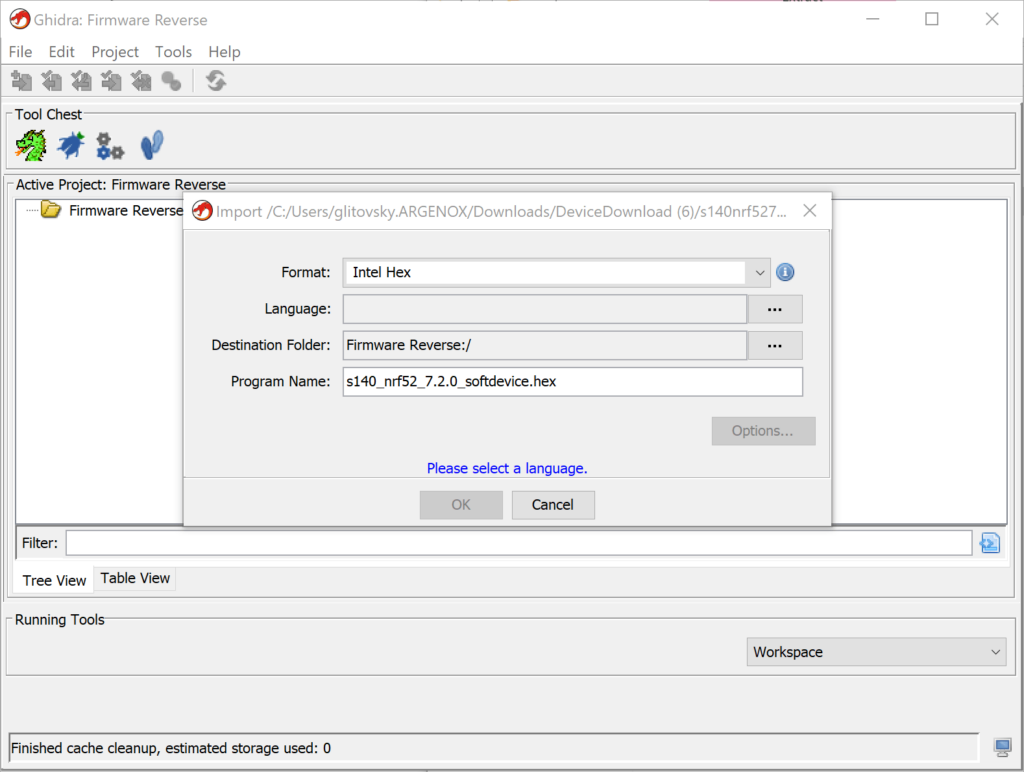
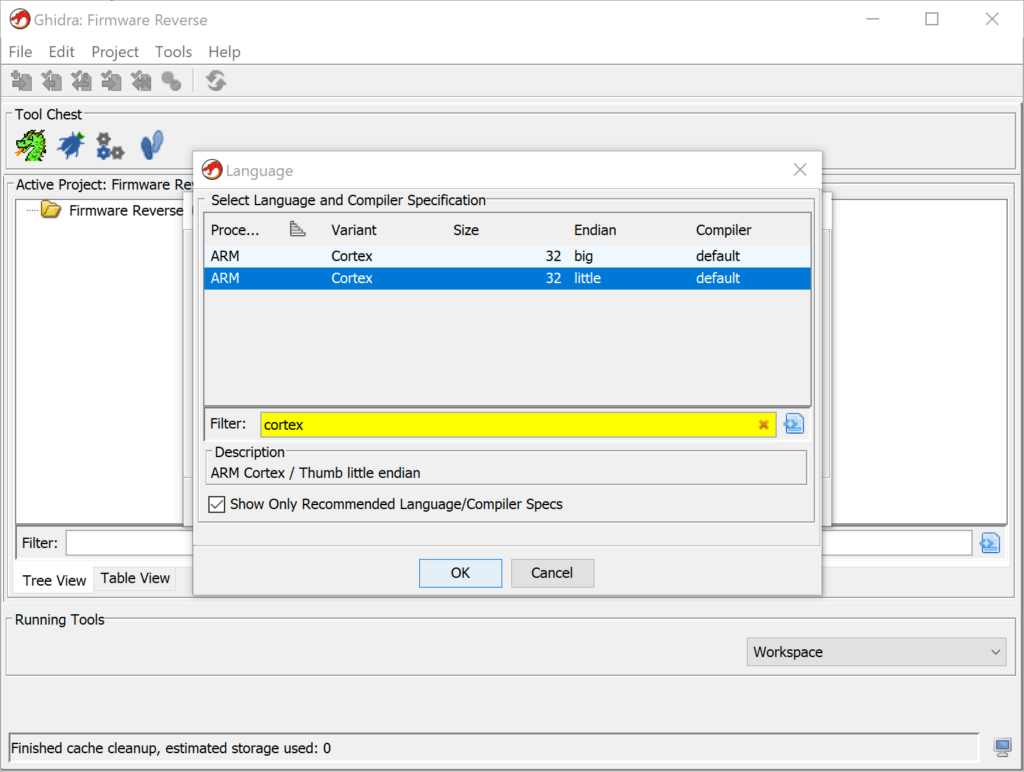
When we import a new binary, Ghidra won’t have any information on it. Disassembly requires knowing the architecture of the process the binary targets, so we need to add that. In this case, we know this is a binary for the nRF52 chipset from Nordic Semiconductor, which uses an ARM Cortex-M4 processor. While ARM processors can technically be both Little Endian or Big Endian, we’re not aware of any Big Endian ARM processors, and the datasheet for the nRF52840 makes clear this is a Little Endian (LE) processor, so we choose that from the wizard:
With that in place, Ghidra takes us back to the project view. Double click on the binary file so we can actually view it.
As a side note, we’ve used a hex file which means that the address space is well defined. Binary files don’t have addresses defined, and can be anywhere in the memory space, so you have to be careful about that.
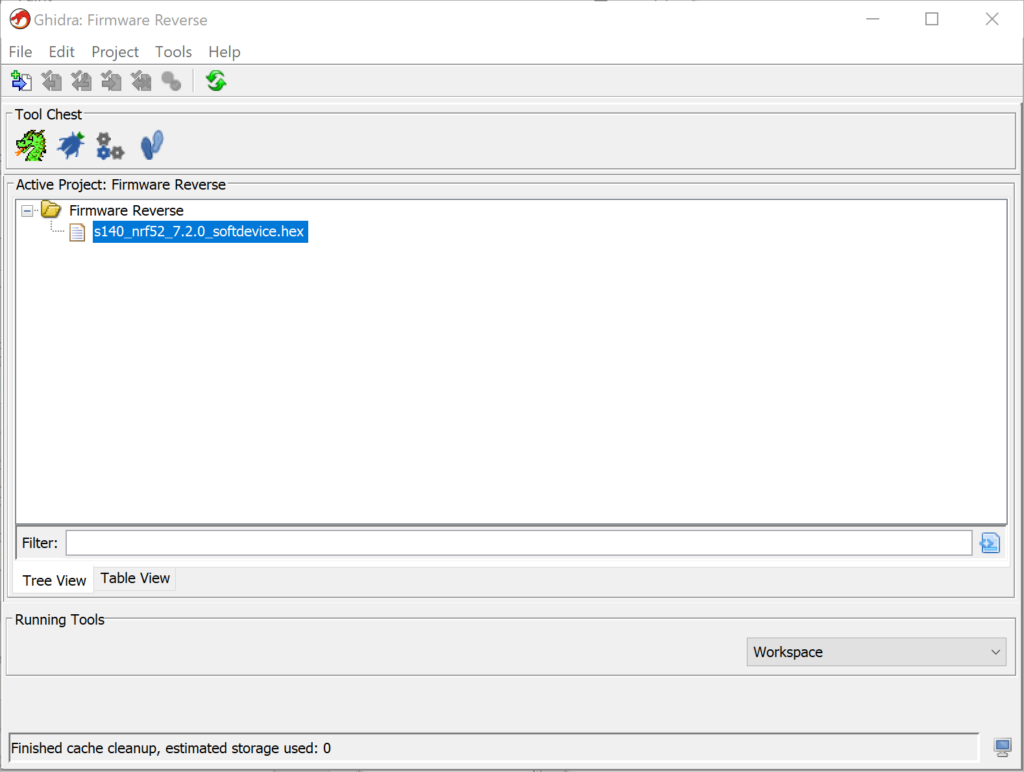
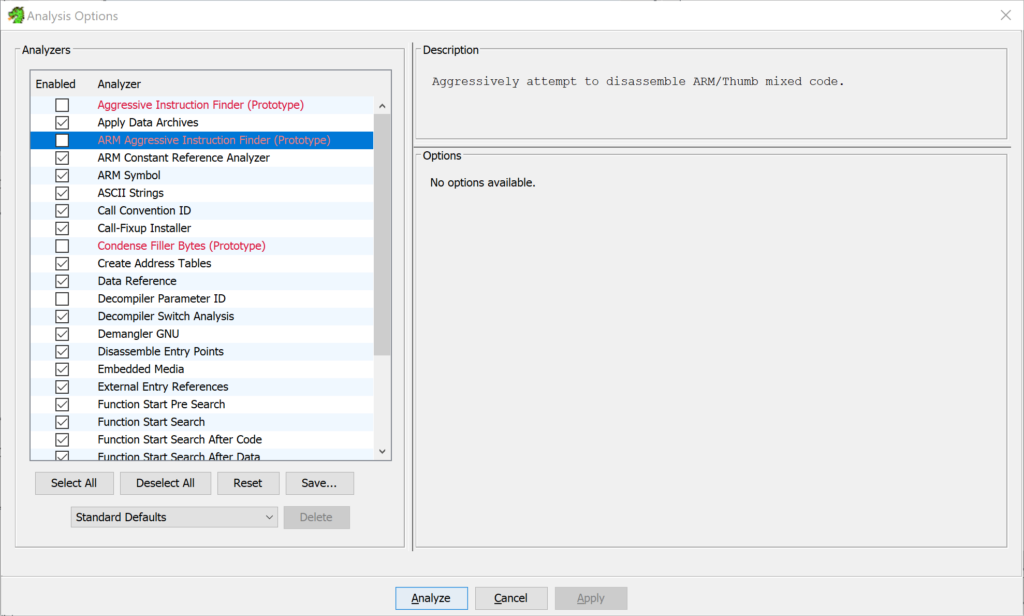
Once you open the binary, Ghidra will ask to analyze the binary if it’s the first time. The default settings are OK, though we have had some good luck sometimes employing the ARM Aggressive Instruction Finder
With the analysis complete we’re finally taken to the main window.
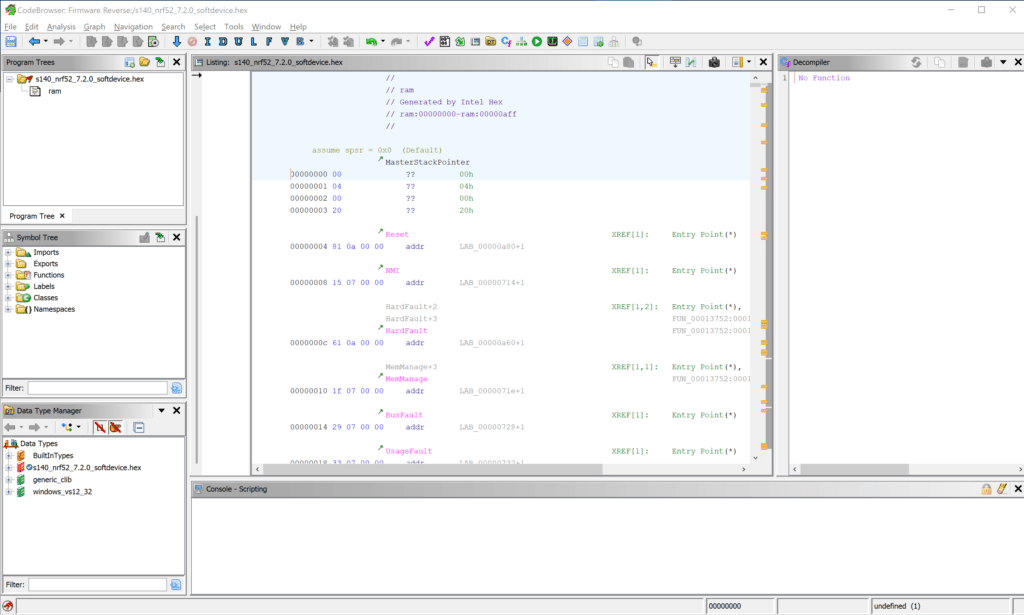
This isn’t a full tutorial in Ghidra, but from this window you can see the start of the 0x00000000 address which is where ARM processors begin executing, which means that the various interrupt vectors are clearly here.
Ghidra does a good job in parsing this information so that it’s easier to see what the code is doing. And on top of that, a large set of scripts can help decode a lot of information.
QEMU
Supported Systems: Linux
How to Get: Install using package manager
Running firmware on hardware is extremely important, but there are moments where it’s quicker and easier to run on emulated hardware. For example, when you have to evaluate firmware for a device you don’t have. QEMU (for Quick Emulator) is a free and open-source emulator that supports a large number of CPU architectures suhc as x86, ARM, RISC-V, MicroBlaze, PowerPC, NIOS2, MIPS and others.
Setting up QEMU is an involved process, so we’ll reserve that for another tutorial.
Summary
There are so many tools for firmware reversing and analysis that are already available and can help extract and disassemble firmware. Even better, these tools are extensible with scripts and plugins so you can customize them to your needs.
Resources
- https://github.com/thyrasec/example-reversing-binaries
- https://github.com/NationalSecurityAgency/ghidra
- https://github.com/ReFirmLabs/binwalk
- https://man7.org/linux/man-pages/man1/file.1.html